right click

Sunday, June 9, 2013

Learn Stiching Saree Blouse

Learn Stiching Saree Blouse

Tutorial: Draft and sew a saree blouse 
continuation part 
Calculation of Center dart width
Chest = 40/4 + 1.5 = 11.5
waist = 36/4 + 1.5 =   10.5  

difference  between chest and waist is 1 inch

therefore the center dart must be of 1 inch wide

Marking of Darts 

  • all the darts should point towards bust/apex point
  • center dart, should be in the middle of shoulder. for example neck is 3 inch wide and shoulder band is 3.5 inch is wide , so the total shoulder is 6.5. mark mid pint on shoulder i.e., 3.2.  Draw stright line towards apex or bust point. 
  • make sure all the darts pointed towdards apex or bust point and there should be one inch differece between start of dart and bust point.
  • on the bracut/patti line mark dart point leaving 3.2inches
  • as calculated above center dart should be of 1 inch wide so, take 0.5 inches on left and right side of  the dart point.
  • remaining darts should be of 0.5 wide and there should 1 inch difference between start of dart point and apex point
  • side and armhole dart mark as per the picutre .
  • back center darts should be of 0.5 to 0.75 inches wide and should point towards apex point.


Sleeves
armpit depth + 1.5 ( desired extra for seam)
rest as mentioned in the picture 

Button Strands

Double patti should be of  2.5 inches wide and of required length

Single patti should be of 1.5 wide and of required length

continued........

Wednesday, January 2, 2013

Learn Stiching Saree Blouse

Tutorial: Draft and sew a saree blouse

 
Women can look Elegant, Pretty, Sweet, Cute, Sexy, Glamour’s, and many more in a saree. Every woman has her own 6 yard dream. So here is the basic tutorial for drafting and sewing saree blouse.

Basically Saree is a Official formal dress in India. A sari or saree is a strip of unstitched cloth, worn by females, ranging from four to nine yards in length that is draped over the body in various styles which is native to the Indian Subcontinent.

Blouse Measurement

A. Blouse Length
B. Chest / Bust (All Around)
C. Waist / Midriff / Below Bust (All Around)
D. Shoulder
E. Armhole (All Around)
F. Sleeve Length
G. Sleeve Circumference (All Around)

Front Side of Blouse:

H. Front Neck Depth
I. Shoulder to Apex Point


Back Side of Blouse:

J. Back Neck Depth


Below is The example measurement, which I have considered for the below pattern


Draft of Front Side of Blouse


Draft of  Back Side of Blouse and Sleeves , Button Strands

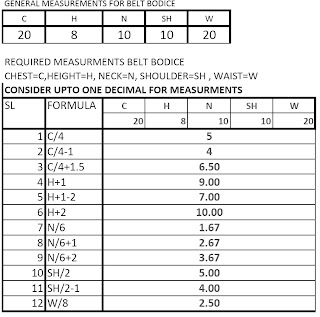
Calculation part of Blouse

Continued.........................................


Monday, December 31, 2012

Happy New Year 2013

Pavade Long pleated skirt

traditional lehenga cholis, traditional kids clothes,


Measurements Needed
·         Shoulder
·         Chest
·         Waist length
·         Waist
·         Sleeve width


Draft of Bodice
Front and back of the bodice of pavade draft is same except for the neck. It is economical to cut paper drafts and then cut the cloth. Draft should be drawn on 4 fold paper.


Skirt

Measurement needed for skirt

Length- length from waist to desired length.
Width- width of the skirt depends upon the gathers. 2 to 3½ times the waist measurement is suitable.

Stitching

Join shoulders. Stitch button stands. Stitch darts (½”)at the places shown in the bodice draft. Stitch armhole and neck with bias binding.

Stitch the sides of the skirt. Attach skirt to bodice distributing the pleats evenly around the waist.

Friday, June 22, 2012

How to stich Cut Banian


SEAMS AND PROCESS
 
  1. Cut out two layers and put them right sides together. 
  2. Stitch up the back, around the neckline and down the other side back. 
  3. Stitch around the armholes
  4.  Join shoulders and sides .
  5. neck should finish with false hem .
  6.  arm holes can be turn down and hem

Wednesday, June 6, 2012

Cut Banian Paper Cutting


Cut Banian Paper Cutting


next week we will see stiching of cut banian

Wednesday, May 30, 2012

Cut Banian Pattern Drawing


CUT BANIAN

REQUIRED MEASURMENTS
  1. CHEST = C
  2. HEIGHT =H
  
Example:
  1. CHEST = 20
  2. HEIGHT =12
Steps:

1-2: Height + 2 inches
2-3: Chest divided by 4 + 1.5 inches
1-6: Chest divided by 12 + 0.5inches or desired neck width
1-4: Chest divided by 12
1-5: Chest divided by 12 + 3.5 inches
7-8: Chest divided by 12 + 0.5inches
8-9: Height divided by 3
7-0: Mark center point, and the gap between a and b is 0.5 inches and then draw curves

Next week we will see paper cutting of Cut Banian